Uploading a Database Driver
- Juliane Wetzel (Unlicensed)
INFO
Find here all information about uploading a database driver. You can add a new database driver or edit an existing database driver as well as delete one.
INFO
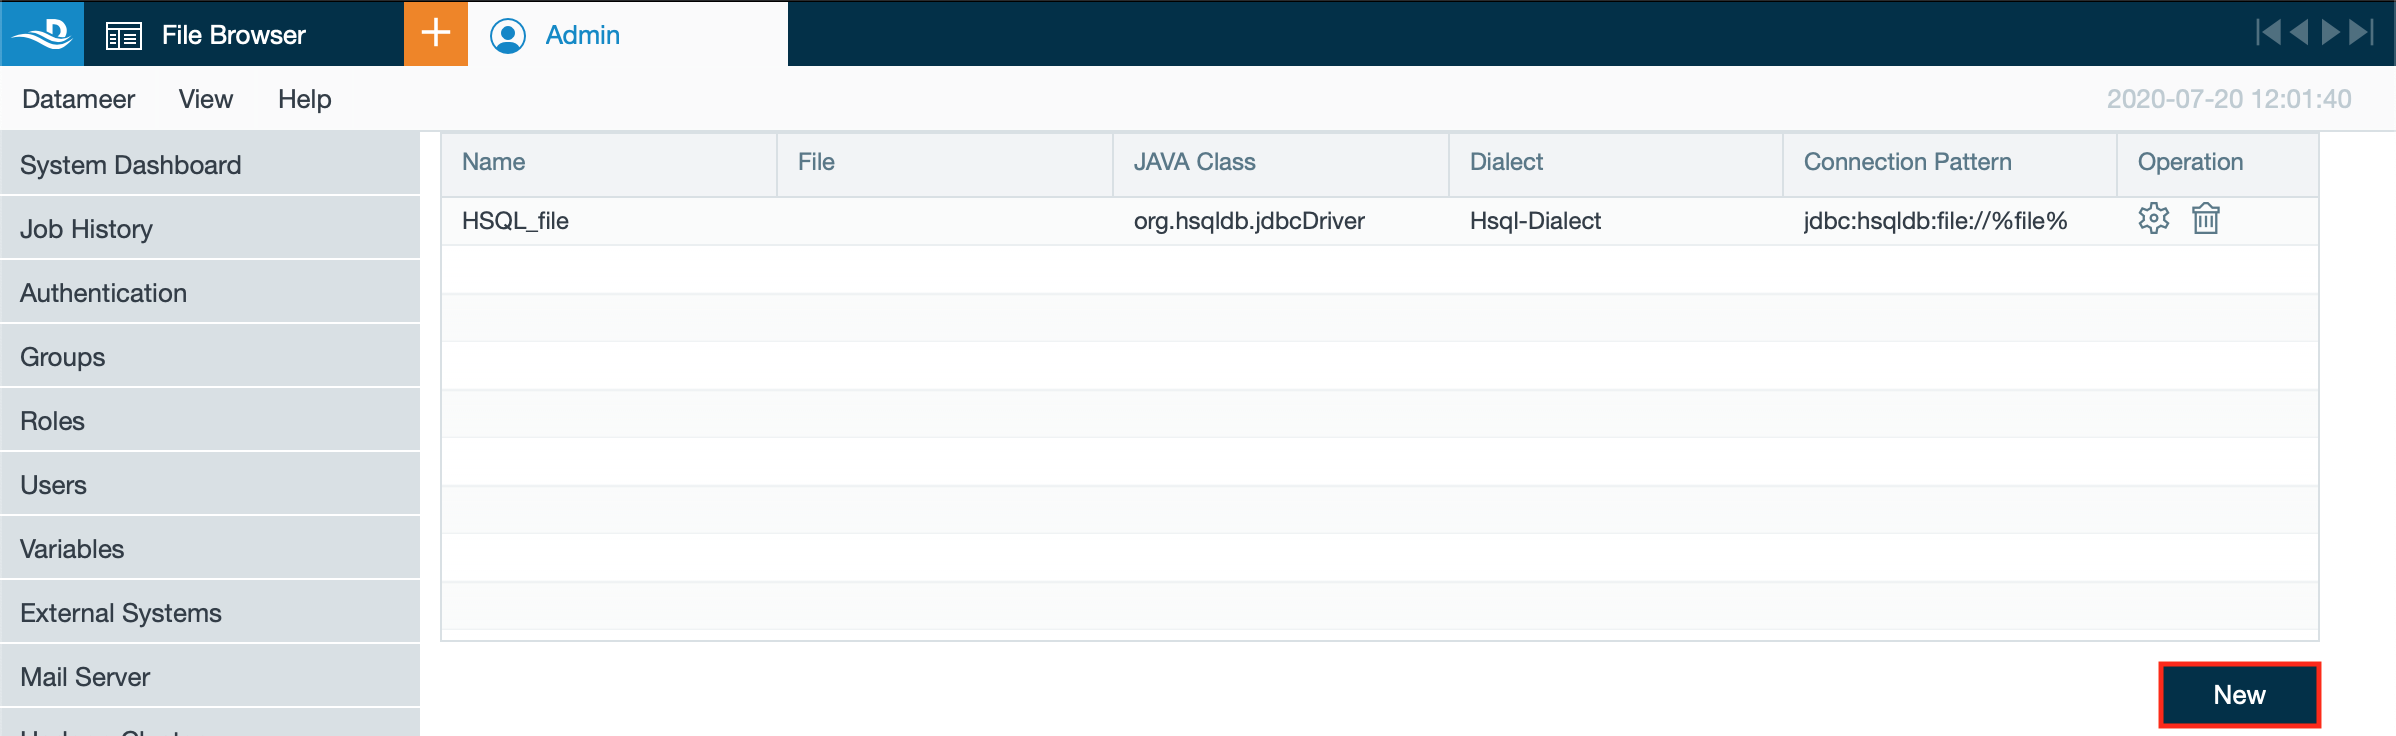
Note that for the HSQL (file) database driver which is pre-installed, in the list of available database drivers, the 'File' column might be empty. The same applies for running Datameer X in MySQL: The 'File' column for the MySQL database driver may also be empty.
Datameer X supports the following database drivers:
INFO
Untested 3rd party JDBC drivers haven't been qualified by Datameer. Generally, ANSI SQL compliant JDBC connections (such as SharePoint or SQL Azure) should work by loading the corresponding JDBC driver. Drivers such as Apache Phoenix that don't support SCHEMA, INSERT, and UPDATE, but do support UPSERT, don't work. At this time, Impala JDBC isn't working.
Amazon Athena DB
INFO
Receive the Amazon Athena database driver, e.g. from https://docs.aws.amazon.com/athena/latest/ug/connect-with-jdbc.html.
To add the Amazon Athena database driver:
- Open the "Admin" tab and select "Database Drivers". The page 'Database Drivers' opens.
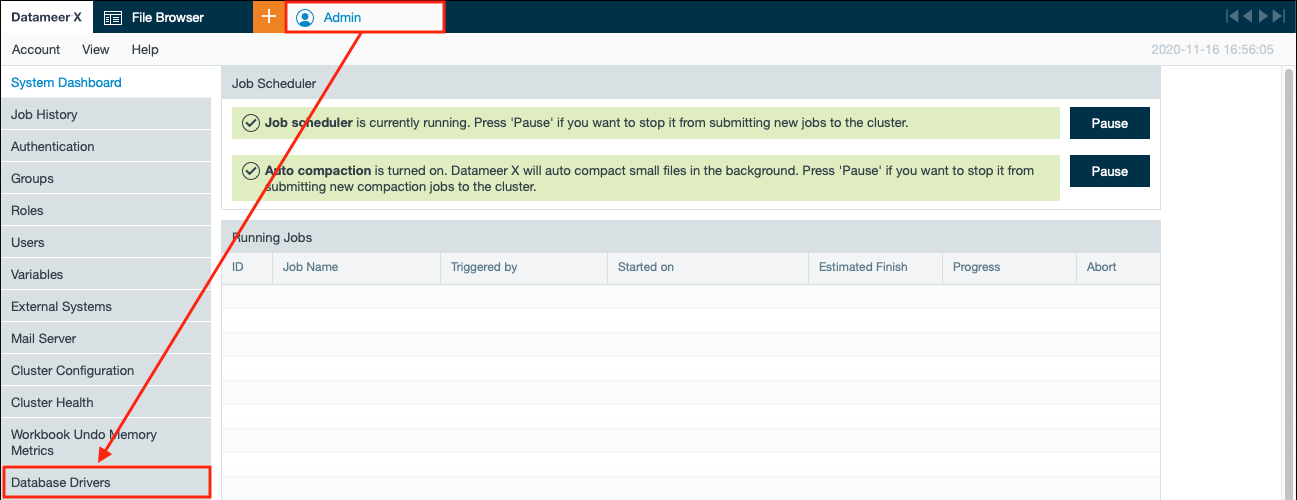
- Click on "New". The page 'Add/ Edit Database Driver' opens.
- Enter the database name.

- Click on "Upload" and upload the JAR file.

- Select "AWS Athena" from the drop-down.

- Enter the driver class.

- Enter the connection pattern and confirm with "Save". The configuration is saved and displayed in the database driver list.

Amazon Redshift
- Go to the driver download site: Native Redshift JDBC driver (Native Amazon Redshift JDBC 4.1 recommended) or the PostgreSQL JDBC driver.
- Select the correct driver.
- Change your working directory to the download folder.
Extract the Zip file.
- In Datameer X go to the Admin tab and then to the Database Drivers tab.
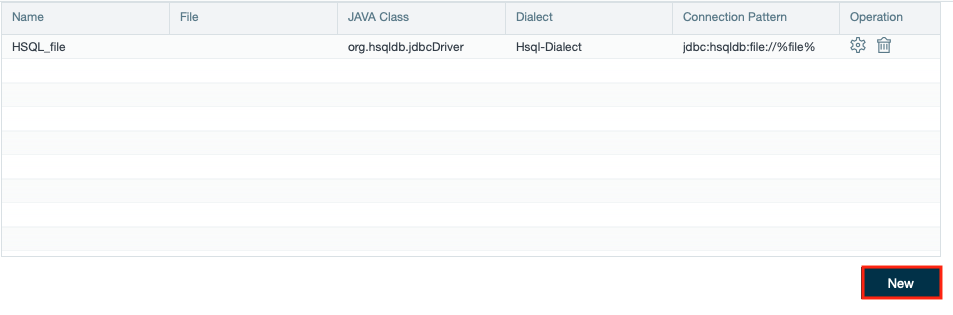
Click New to add a new database driver.
- Enter the following information:
- Name: Redshift
- Jar File: (your driver)
- Database Driver Template: Amazon Redshift
- Driver Class:
- Redshift: com.amazon.redshift.jdbc41.Driver (4.1 recommended)
- PostgreSQL: org.postgresql.Driver
- Connection Pattern:
- Redshift: jbdc:redshift://%host%:%port%/%dbName%
- PostgreSQL: jbdc:postgresql://%host%:%port%/%dbName%

- Redshift should now appear as an available database driver.
Azure Cosmos DB
INFO
Receive the Azure Cosmos database driver from https://www.cdata.com/drivers/cosmosdb/jdbc/.
To add the Azure Cosmos database driver:
- Open the "Admin" tab and select "Database Drivers". The page 'Database Drivers' opens.
- Click on "New". The page 'Add/ Edit Database Driver' opens.
- Enter the database name.

- Click on "Upload" and upload the JAR file.
- Select "Azure Cosmos" from the drop-down.

- Enter the driver class.

- Enter the connection pattern and confirm with "Save". The configuration is saved and displayed in the database driver list.
INFO: Find your account key on your Azure Cosmos DB instance under 'settings/keys: SECONDARY KEY'.
Azure Databricks Database Driver (JDBC)
INFO
Receive the Azure Databricks database driver from https://databricks.com/de/spark/odbc-driver-download.
To add the Azure Databricks database driver:
- Open the "Admin" tab and select "Database Drivers". The page 'Database Drivers' opens.
- Click on "New". The page 'Add/ Edit Database Driver' opens.
- Enter the database name.

- Click on "Upload" and upload the JAR file.
INFO: Get the file from https://databricks.com/de/spak/odbc-driver-download. - Select "Databricks JDBC V2.6.x" from the drop-down.

- Enter the driver class.

- Enter the connection pattern and confirm with "Save". The configuration is saved and displayed in the database driver list.
INFO: Note that the pattern must contain the expression 'token' as the UID parameter and the '<personal-access-token>' as the PWD parameter that you created in Azure Databricks before.
Azure Synapse Database Driver
INFO
Receive the Azure Synapse database driver from e.g. here.
To add the Azure Synapse database driver:
- Open the "Admin" tab and select "Database Drivers". The page 'Database Drivers' opens.
- Click on "New". The page 'Add/ Edit Database Driver' opens.
- Enter the database name, e.g. 'Synapse_Driver' .

- Click on "Upload" and upload the JAR file.

- Select "Microsoft Azure Synapse" from the drop-down.

- View the driver class.

- View the connection pattern and confirm with "Save". The configuration is saved and displayed in the database driver list.

DB2
- Go to the driver download site: http://www-01.ibm.com/support/docview.wss?rs=4020&uid=swg21385217
- Select the following driver: IBM Data Server Driver for JDBC and SQLJ (JCC Driver)
- Change your working directory to the download folder.
Extract the Zip file.
unzip ibm_data_server_driver_for_jdbc_sqlj_v97.zip
- In Datameer X go to the Admin tab and then to the Database Drivers tab.
Click New to add a new database driver.
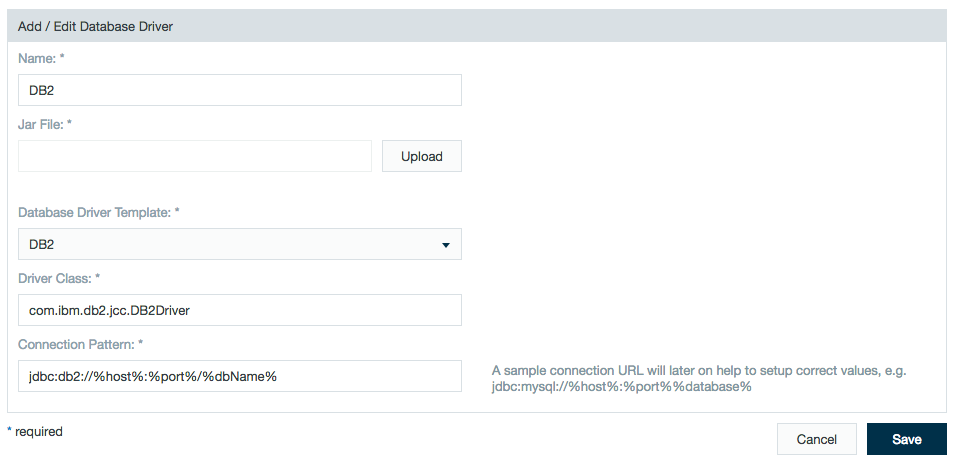
- Enter the following information:
- Name: DB2
- Jar File: db2jcc4.jar
- Database Driver Template: DB2
- Driver Class: com.ibm.db2.jcc.DB2Driver
- Connection Pattern: jdbc:db2://%host%:%port%/%dbName%
- DB2 should now appear as an available database driver.
HSQL_file
HSQL (file) – You need to provide the database name you want to use, the username, and password.
MariaDB
Available as of Datameer X 7.4
- Go to the driver download site: https://downloads.mariadb.org/connector-java/
- Select a driver archive appropriate for your system, download the file, and extract it into your local file system.
- Locate the driver .jar named mariadb-java-client-<version>-sources.jar in your file system.
- In Datameer X go to the Admin tab and then to the Database Drivers tab.
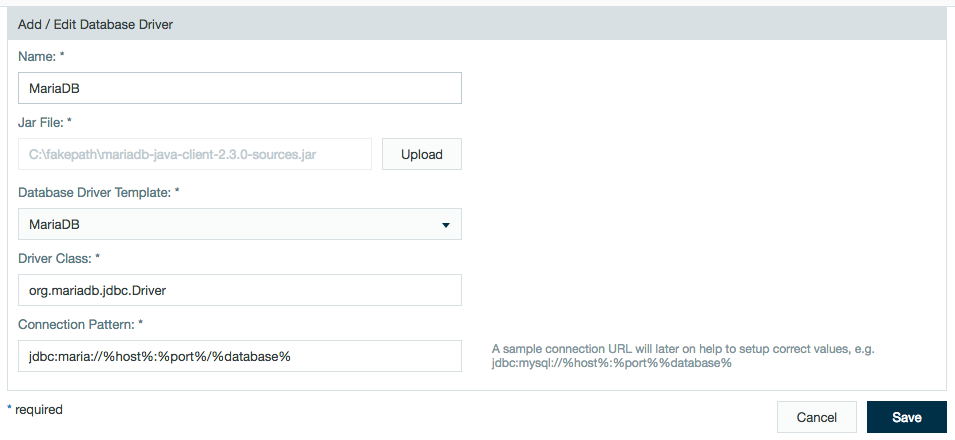
Click New to add a new database driver. - Enter the following information:
- Name: MariaDB
- Jar File: mariadb-java-client-<version>-sources.jar (file you downloaded)
- Database Driver Template : MariaDB
- Driver Class: org.mariadb.jdbc.Driver
- Connection Pattern: jdbc:maria://%host%:%port%/%database%
- MariaDB should now appear as an available database driver.
Microsoft SQL Server
INFO
Receive a driver from here: https://docs.microsoft.com/en-us/sql/connect/jdbc/release-notes-for-the-jdbc-driver?view=sql-server-ver15.
Select a driver archive appropriate for your system, download the file, and extract it into your local file system. Locate the driver .jar named 'mssql-jdbc-.jar*' in your file system.
To add the Microsoft SQL JDBC driver:
- Open the "Admin" tab and select "Database Drivers". The page 'Database Drivers' opens.
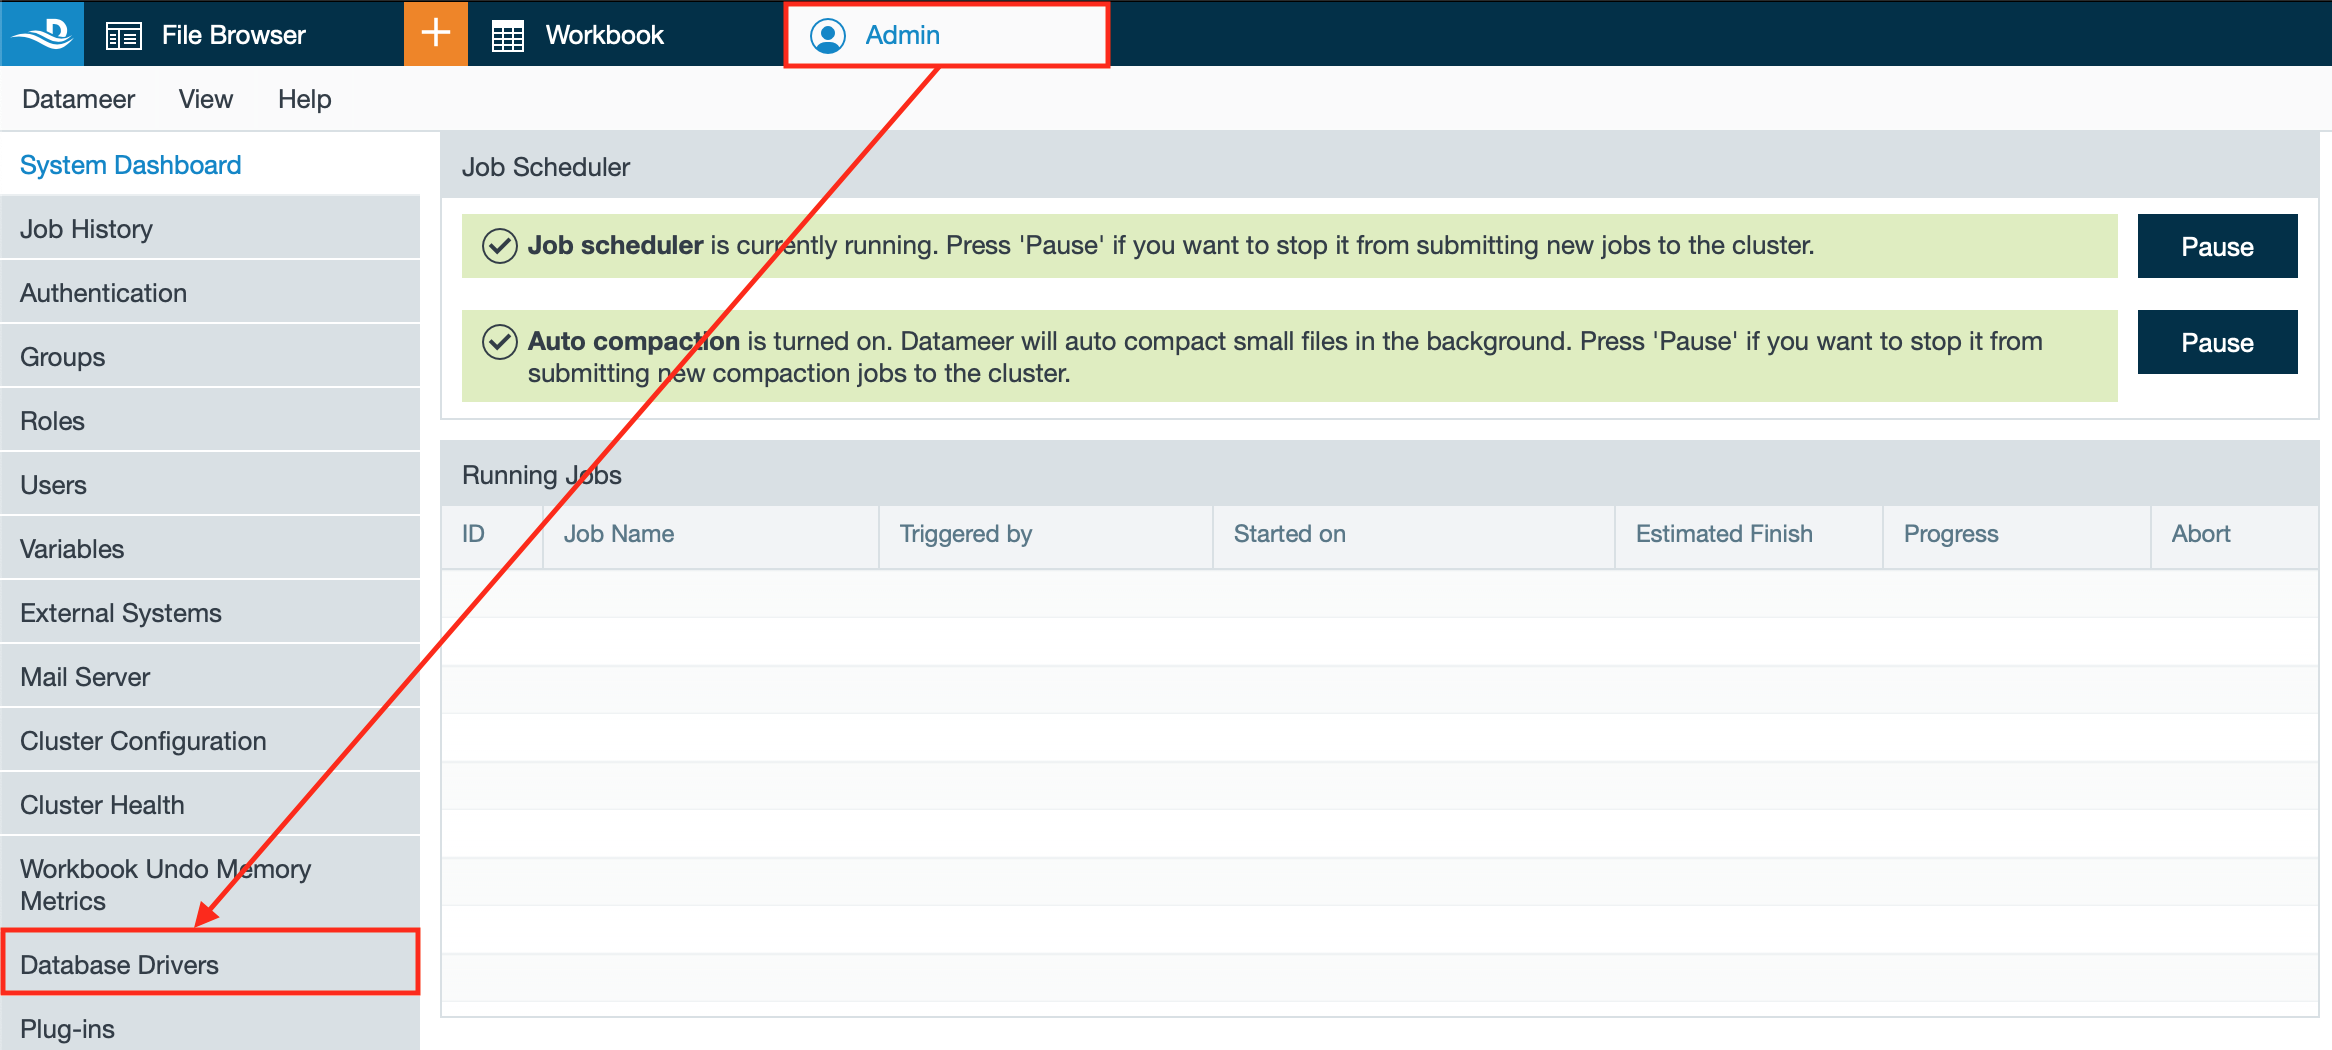
- Click on "New". The page 'Add/ Edit Database Driver' opens.
- Enter the database name, e.g. 'Ms_SQL_JDBC' .

- Click on "Upload" and upload the JAR file.

- Select "Microsoft SQL Server 2014" from the drop-down.

- View the driver class.

- Adjust the connection pattern and confirm with "Save". The configuration is saved and displayed in the database driver list.

MySQL
INFO
Receive the MySQL database driver from http://www.mysql.com/downloads/connector/j/. The driver .jar file named 'mysql-connector-java-<version>-bin.jar' must be located in your file system.
As of Datameer X version 11.0, only versions 5.5 and above are supported for MySQL.
- In Datameer X go to the Admin tab and then to the Database Drivers tab.
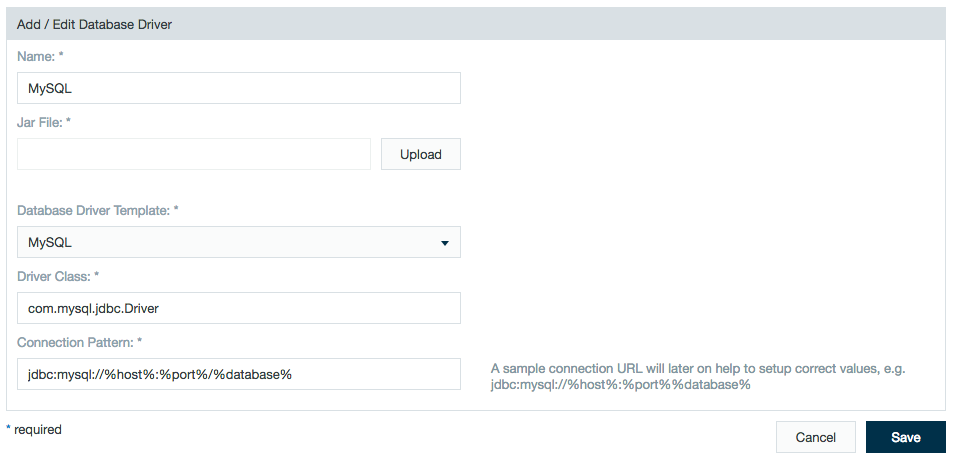
Click New to add a new database driver. - Enter the following information:
- Name: MySQL
- Jar File: mysql-connector-java-<version>-bin.jar (file you downloaded)
- Database Driver Template : MySQL
- Driver Class: com.mysql.jdbc.Driver
- Connection Pattern: jdbc:mysql://%host%:%port%/%database%
- MySQL should now appear as an available database driver.
Netezza DB
INFO
Receive the Netezza database driver from IBM.
INFO
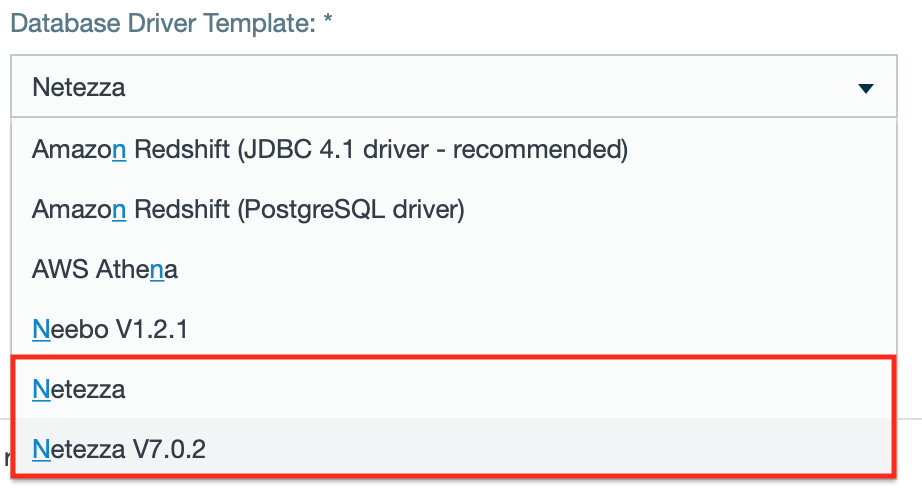
Datameer X support two different Netezza dialects:
- Netezza
- Recommended for Netezza versions after 7.0.2.
- Supports multi-schema.
- Schema can be selected when exporting.
- Table and column identifiers are stored, per default, as case insensitive when exporting from Datameer.
- Netezza v7.0.2
- Recommended for Netezza versions 7.0.2 and earlier.
- No support for multi-schema. Only written in the default schema.
- Table and column identifiers are stored as case sensitive when exporting from Datameer.
If multiple Netezza instances are being used with Datameer X all instances must follow the same dialect.
To add the Netezza database driver:
- Open the "Admin" tab and select "Database Drivers". The page 'Database Drivers' opens.
- Click on "New". The page 'Add/ Edit Database Driver' opens.
- Enter the database name.

- Click on "Upload" and upload the JAR file.
- Select "Netezza" or "Netezza V7.0.2" from the drop-down.
- Enter the driver class.

- Enter the connection pattern and confirm with "Save". The configuration is saved and displayed in the database driver list.

- Open the "Admin" tab and select "Database Drivers". The page 'Database Drivers' opens.
Oracle
- Go to the driver download site: http://www.oracle.com/technetwork/database/enterprise-edition/jdbc-112010-090769.html
- Select the following driver:
(or select a driver appropriate for your database.)ojdbc7.jar (2,111,220 bytes) - Classes for use with JDK 1.7. It contains the JDBC driver classes except classes for NLS support in Oracle Object and Collection types.
- In Datameer X go to the Admin tab and then to the Database Drivers tab.
Click New to add a new database driver.
- Enter the following information:
- Name: Oracle
- Jar File: ojdbc6.jar (or other file you downloaded)
- Database Driver Template : Oracle
- Driver Class: oracle.jdbc.driver.OracleDriver
- Connection Pattern: jdbc:oracle:thin:@%hostName%:%port%:%sidName% or jdbc:oracle:thin:@%hostName%:%port%/%serviceName%
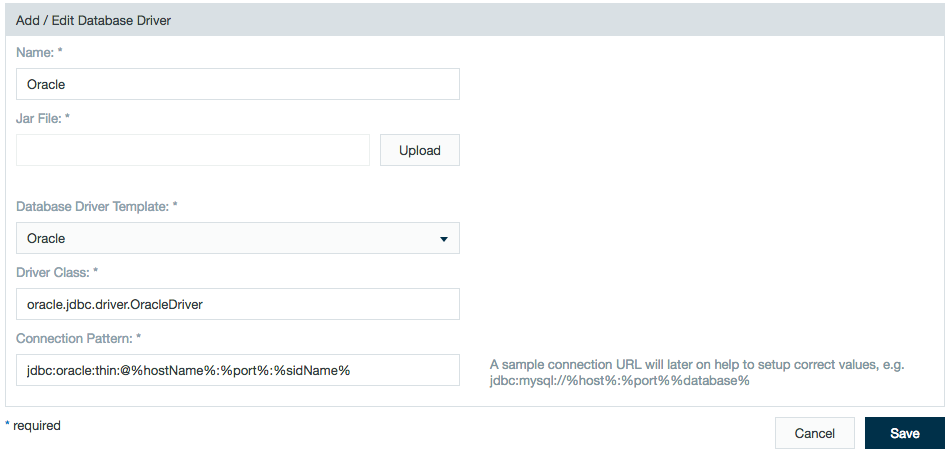
- Oracle should now appear as an available database driver.
PostgreSQL
- Go to the driver download site: http://jdbc.postgresql.org/download.html
- Select a driver appropriate for your system, and download the file.
- Locate the driver .jar named postgresql-<version>-<build>.<jdbc version>.jar in your file system.
- In Datameer X go to the Administration tab and then to the Database Drivers tab.
Click on the New button to add a new database driver. - Enter the following information:
- Name: PostgreSQL
- Jar File: postgresql-<version>-<build>.<jdbc version>.jar (file you downloaded)
- Database Driver Template : PostgreSQL
- Driver Class: org.postgresql.Driver
- Connection Pattern: jdbc:postgresql://%host%:%port%/%dbName%
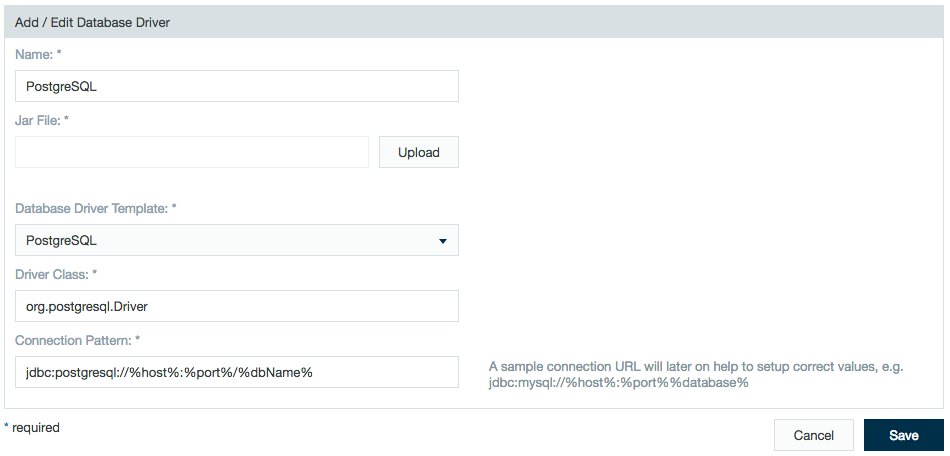
- PostgreSQL should now appear as an available database driver.
Sybase IQ
- Check your local system or ask your contact at Sybase for a database driver.
- Locate the Sybase driver. (jconn)
- In Datameer X go to the Admin tab and then to the Database Drivers tab.
Click New to add a new database driver.
Enter the following information:
- Name: Sybase IQ
- Jar File: (your driver)
- Database Driver Template : Sybase IQ
- Driver Class: com.sybase.jdbc3.jdbc.SybDriver
- Connection Pattern: jdbc:sybase:Tds:%host%:%port%?ServiceName=%dbName%
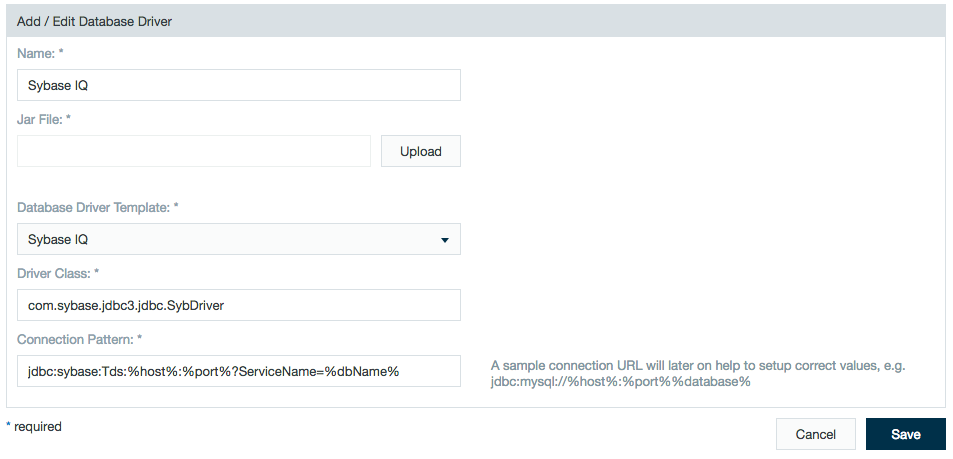
- Sybase IQ should now appear as an available database driver.
Teradata
- Go to the driver download site: http://downloads.teradata.com/download/connectivity/jdbc-driver
- Select the driver: Teradata JDBC Driver <version>
- Change the working directory to the download folder.
Extract the Zip file.
unzip TeraJDBC__indep_indep.<version>.zip
- In Datameer X go to the Admin tab and then to the Database Drivers tab.
Click New to add a new database driver.
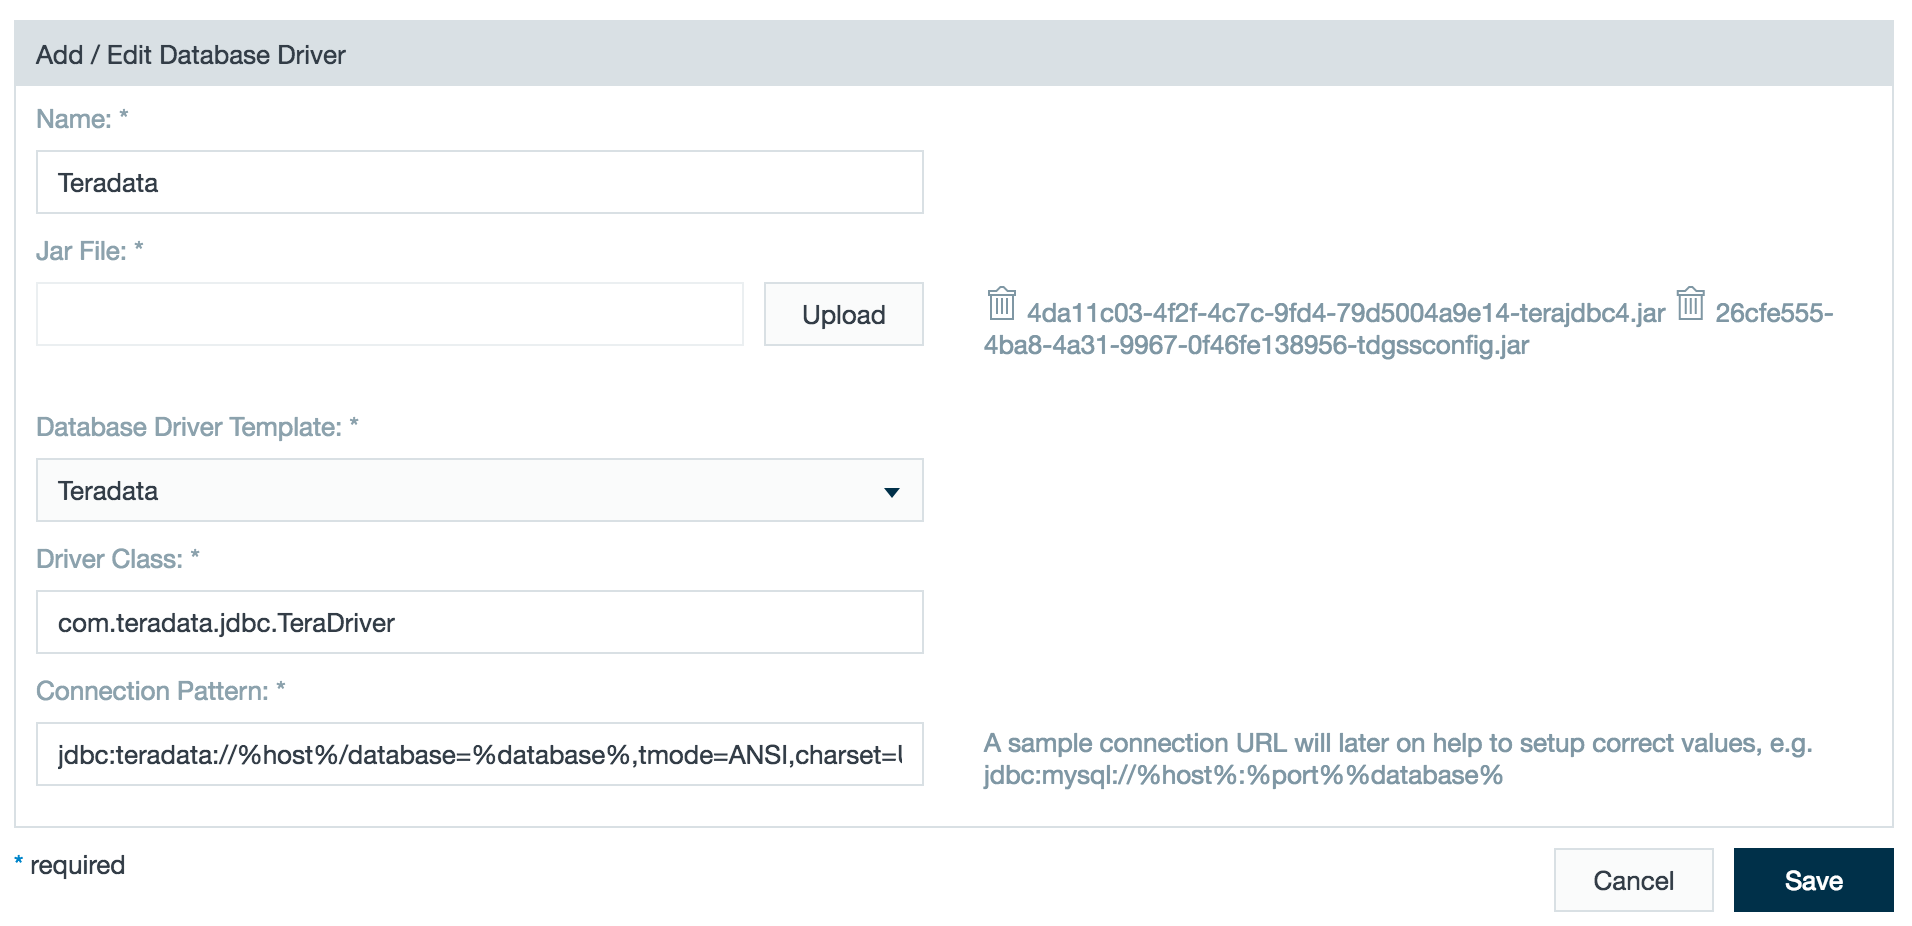
- Enter the following information:
- Name: Teradata
Jar File: 'terajdbc4.jar' and 'tdgssconfig.jar'
Teradata requires two different JAR files.
- Click Upload.
- Highlight both needed JAR files and click Open.
Only one JAR file is currently being displayed on the page. In order to confirm that both JAR files have been uploaded:
- Click Save.
- Mouse-over the cell on the table for the Teradata's JAR files to verify both JARs have been accepted.
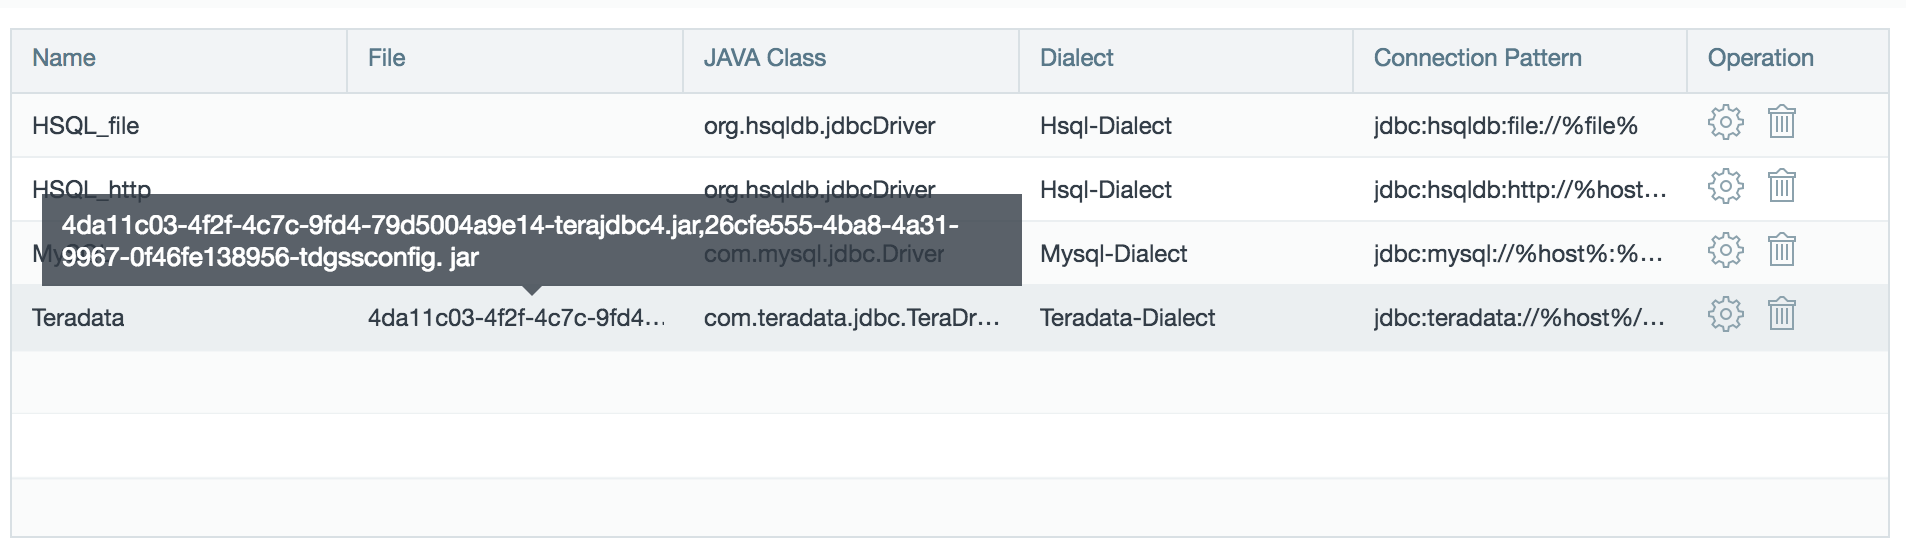
- Database Driver Template : Teradata
- Driver Class: com.teradata.jdbc.TeraDriver
- Connection Pattern: jdbc:teradata://%host%/database=%database%,tmode=ANSI,charset=UTF8
- Teradata should now appear as an available database driver.
Teradata Aster
- Go to the driver download site: http://downloads.teradata.com/download/aster/aster-client-tools-for-linux
- Select the driver: Aster JDBC Driver <version>
- Change the working directory to the download folder.
Extract the Zip file.
unzip AsterJDBC__indep_indep.<version>.zip
- In Datameer X go to the Admin tab and then to the Database Drivers tab.
Click New to add a new database driver.
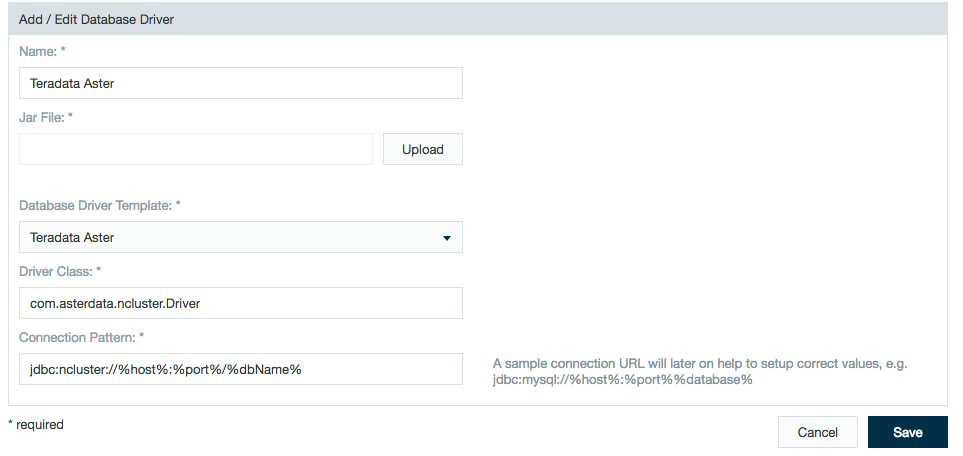
- Enter the following information:
- Name: Teradata Aster
- Jar File:
- Database Driver Template : Teradata Aster
- Driver Class: com.asterdata.ncluster.Driver
- Connection Pattern: jdbc:ncluster://%host%:%port%/%dbName%
- Teradata should now appear as an available database driver.
Vertica 5.1+
- Go to the myVertica site, and register to download the JDBC Driver.
- Select a driver appropriate for your system, and download the file.
- Locate the driver .jar named vertica_<version>-<build>_<jdbc version>.jar in your file system.
- In Datameer X go to the Admin tab and then to the Database Drivers tab.
Click New to add a new database driver.
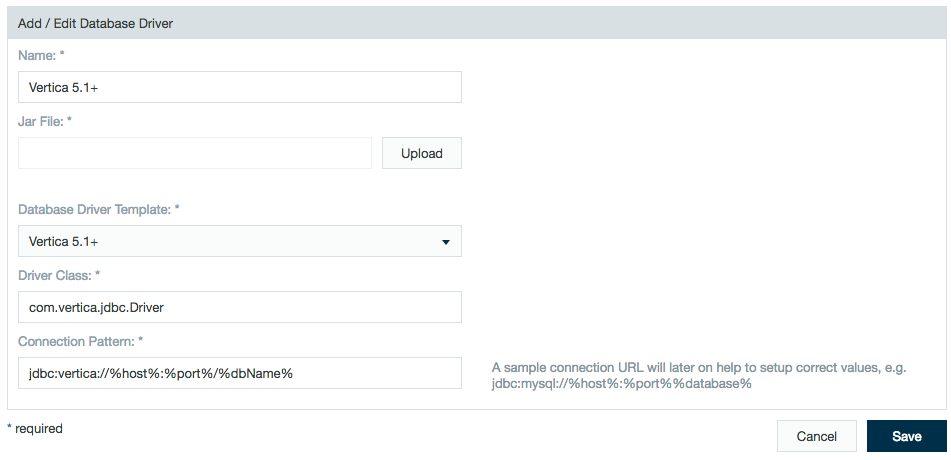
- Enter the following information:
- Name: Vertica 5.1+
- Jar File: vertica_<version>-<build>_<jdbc version>.jar (file you downloaded)
- Database Driver Template : Vertica 5.1+
- Driver Class: com.vertica.jdbc.Driver
- Connection Pattern: jdbc:vertica://%host%:%port%/%dbName%
- Vertica should now appear as an available database driver.