Exporting Data
- Charles Bishop (Deactivated)
You can create export jobs to export data from Datameer to other connections such as a database, remote file server, or export results to a third-party BI (business intelligence) software package. Exported data is the result from executing analyses in a workbook on the original data set. You can initiate a one-time manual export, or you can configure the job to run each time the workbook is updated or at a specific time interval.
It is also possible to download data from Datameer without using an export job.
Introduction
Before you can export data, you must create a workbook. Once the workbook has executed, you can export data from one of the saved sheets in that workbook.
Exporting data is only available in Datameer's Enterprise product.
File Formats Available
Select to export a worksheet to one of the following file formats:
- Apache AVRO
- CSV
- Parquet
- Tableau (TDSX)
- Tableau (TDE)
Exporting Data
Only the data from a saved workbook sheet is available for export.
To export data:
- Select Export Data from the + (plus) drop down menu located in the top left corner of the screen or right-click in the navigation bar are the left side of the screen and select Create New > Export Data.
- Select a workbook by clicking Select then click Next.
- Select which sheet to export, then click Next. At the bottom of the page you see a preview of the a sheet's data.
Select which connection the data should be exported to, either an existing connection or create a new one. Select to export the data as a CSV file, an AVRO file, a Parquet file, or Tableau (TDSX) file. Then click Next.
- Enter the information on the Data Details tab which varies depending on the type of file you are creating. Click Next.
- Under the File settings, enter the file name and file path. Variable placeholders can be used instead of static values. Exports with the same file name will be overwritten.
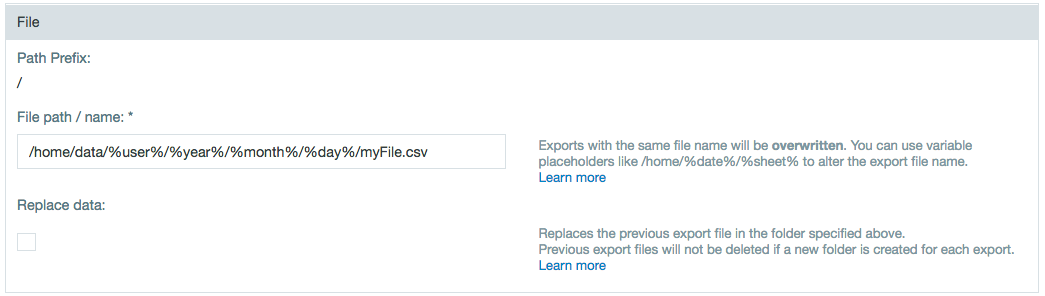
Under Advanced Settings, enter the maximum file size and how consecutive files should be numbered. All export jobs add a task number to the end of the filenames (before the extension) generated by the export job.

There are additional settings if the file is being exported as a CSV. Select whether column headers should be contained in the first row, and how delimiter, quote, and escape characters should be defined.
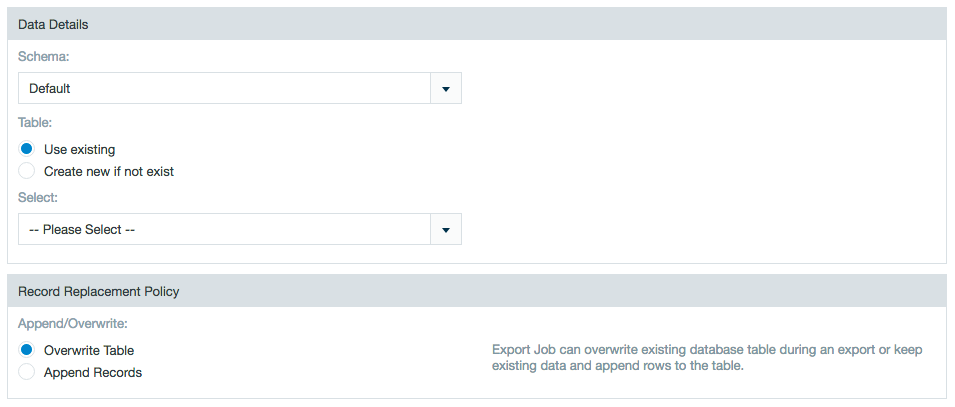
If you are exporting a float value to a .CSV, an additional trailing zero (.0) is added following the original value. Leading zeros (0.) are removed if the integer part of the float value is larger than zero.If you export to a database such as MySQL, you must select a table and select either Use Existing Table to overwrite the database table or Create new if it doesn't exist to add the table. If you use an existing table with a large amount of previous data, the overall export might be slow as it first needs to delete the old data. However, if you create a new table, delete statements aren't used and performance might be improved. There is a hard limit of 1,000 entries.
Exporting with SFTP
An additional requirement for exporting with SFTP is that the user creating the export job must have permissions to create a folder (
mkdir) on the SFTP server. This permission is required even when the folder on the SFTP server already exists.Exporting to a database
When exporting to a database, the database connector is associated with a user name. This database user must have write and/or create permissions on the database itself in order to complete the export job.
When exporting data to DB2 or to an Oracle connection, there are limitations on the number of characters contained in string data fields.
- for DB2, the number of characters is limited to 2000.
- for Oracle, the number of characters is limited to 4000.
Attempting to export data fields containing a larger number of characters results in dropped records.
Record replacement policy
If the Use existing option is selected Datameer doesn't create a primary key column with name "ID". (i.e., The workbook must be aware of the ID column. All columns from the destination table (can't be null) must be mapped to a column of the workbook.)
Append Mode
- The records append to the existing table.
Overwrite Mode
- All records from the existing table are deleted.
- New records are written to the destination table.
Tips:
- Always select Use existing for tables created outside of Datameer (e.g., Netezza)
- Never select Use existing for tables created via Datameer.
If the Create new if not exist option is selected Datameer creates an additional column with name "ID" (primary key). When the database supports auto increment, the database computes the value of this column.
Example: Netezza doesn't support auto increment. In this case Datameer uses a sequence database object to generate the ID. Specific for Netezza: the name of the sequence used is <tablename>_seq.
Append Mode
- The table is created if it doesn't already exists, otherwise the existing table is re-used without changing any schema.
- The records are appended to the existing table.
Overwrite Mode
- Any previous tmp table is first dropped.
- A tmp table is created.
- The records are written to the tmp table.
- The entire destination table is dropped if one exists.
- The tmp table is renamed to the destination table.
- The tmp table is dropped.
Tip:
- Always select Create new if not exist for tables created via Datameer.
- Never select Create new if not exist for tables created outside of Datameer (e.g., Netezza)
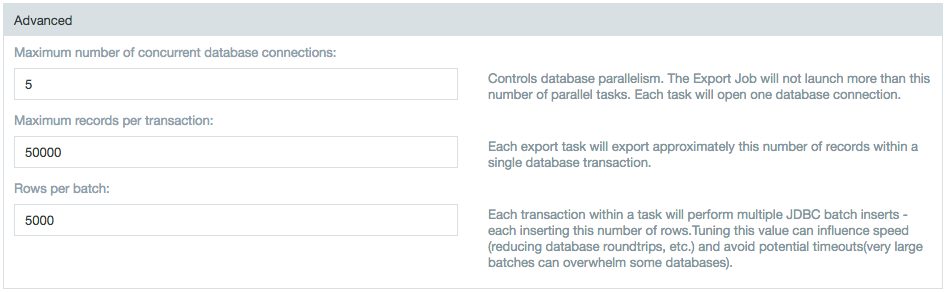
Advanced settings
- Setting the Maximum number of concurrent data base connections gives control of database parallelism. The export job can't launch more than the set number of parallel tasks. Each task opens one database connection.
- Setting the Maximum records per transaction exports approximately this number of records within a single database transaction.
- Setting the Rows per batch establishs a limit for the number of rows inserted for each transaction within a task. Tuning this value can influence speed and avoid potential timeouts. Very large batches can overwhelm some databases and limiting the number of rows returned at a time can reduce strain.
As of Datameer v6.1
Netezza export jobs have the option of storing table and column identifiers as case-insensitive (regular identifiers) or case-sensitive (delimited identifiers). Prior to Datameer v6.2, all identifiers were stored as case-sensitive. As of Datameer v6.2, the default setting for identifiers in Netezza export jobs is set as case-insensitive. Previous Netezza export jobs case sensitivity settings can be change within the export job wizard. The schema for the database is always case-sensitive. Changing this setting might create a new table in Netezza.

- Under the File settings, enter the file name and file path. Variable placeholders can be used instead of static values. Exports with the same file name will be overwritten.
Select which fields to include. Clear any fields that should be excluded. Select whether empty fields can be accepted.
Tips:
- If there is a date field included in the data, you can change the parse pattern format to be used during export. The default date parse pattern for an export job is [yyyy-MM-dd HH:mm:ss].
- Big integers, big decimals, and dates in Datameer are treated differently in Datameer than in Hive and use a larger range of values. Because of this they are written as strings into a Hive table on export. For a full list of how mapping works, see Data Field Types in Datameer .
- When exporting to Teradata, a row-length limit is automatically set to 64 kilobytes by Teradata. Additionally, by default, every string column is set to a limit of 8019 bytes, so when exports with more than 8 string columns reach this limit they show an error message. To fix this, manually create the table in Teradata and then set Datameer to append instead of replace the table.
By default, the column mapping of the export job is based on the columns of the current worksheet being exported. When editing and/or overwriting an export job, it is possible for the column mapping to be based on the the previous export job mapping instead of the current worksheet column mapping. This can be configured in the default.properties file.default.properties# Enables the workbook columns to synchronize with export wizard mapping. # If enabled, the export wizard displays the workbook columns on the mapping step. # Otherwise, the saved mapping from the database is used on the export wizard's mapping step. export.file.inherit-workbook-column-names.enabled=true export.db.inherit-workbook-column-names.enabled=true export.other.inherit-workbook-column-names.enabled=true
Select how to handle invalid records, and click Next.
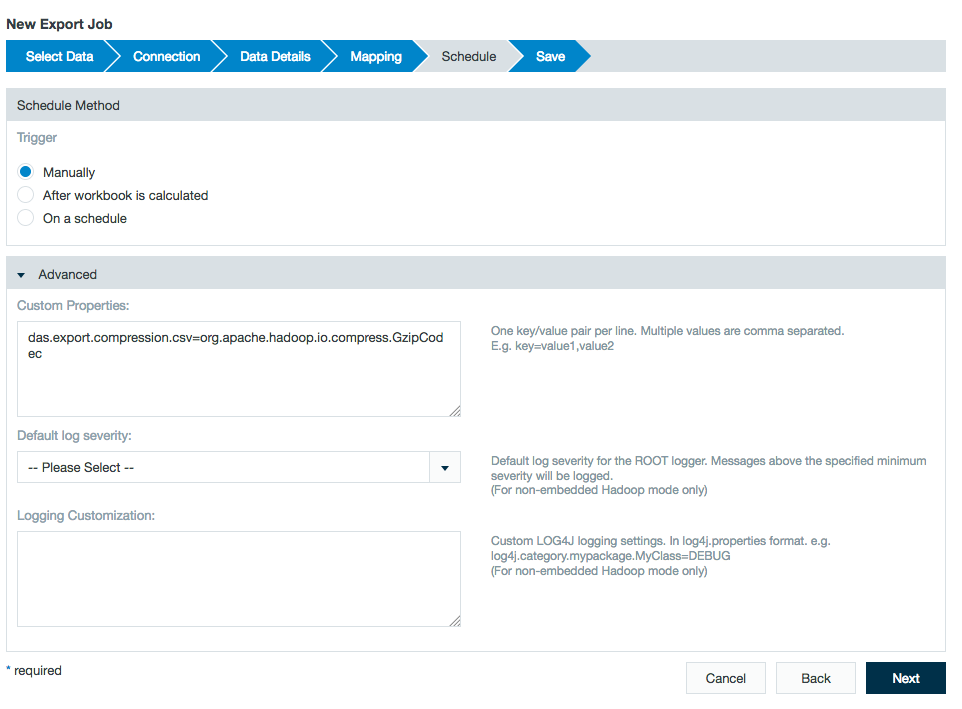
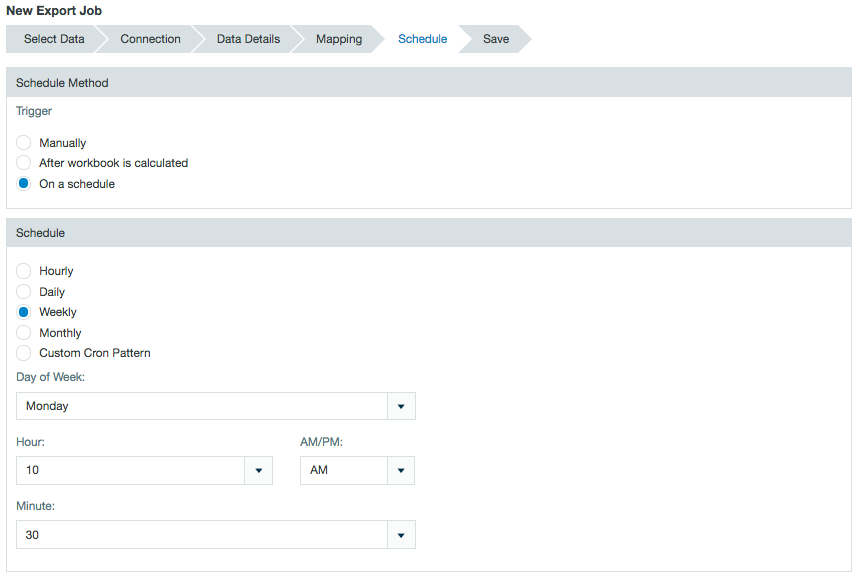
- Select the schedule for exporting the data. Select Manually for a non-recurrent export or you can select either After the workbook is calculated or On a Schedule. If you select On a Schedule, indicate the time settings or use a custom cron pattern. Under Advanced Settings, you can enter custom properties as key/value pairs. Then click Next.
- Enter a description if desired, click Save As. Give the file a name, then click Save. You can also enter an email address to receive any error messages.
Exporting compressed CSV files
To export a file as a compressed CSV:
- Open or edit an export job.
- Move through the wizard setting up the export job.
- Under the Connection section, select CSV as the file type.
- Continue setting up the export job in the wizard.
Under the Schedule section, open the advanced settings and enter the following property in the Custom Properties field:
das.export.compression.csv=org.apache.hadoop.io.compress.<codec>Codec
More information on <codec> values for Gzip, Default (deflate), Snappy, etc. are found on Using Compression with Hadoop and Datameer.
- Finish completing the wizard and save the export job.
Scheduling Job Runtime
You have a great deal of flexibility in choosing when jobs are run. You can choose to run them manually, after a workbook runs, or at a interval you specify.
- Create an new export job or right-click and select Open to open the export job configuration wizard.
- Under the Schedule settings, select Manually, After workbook is caculated, or Scheduled.
- When Scheduled is selected, specificy a time for the export job to run.
- Click Save to save your changes.
The schedule of an export can also be viewed or edited from the inspector in the file browser.
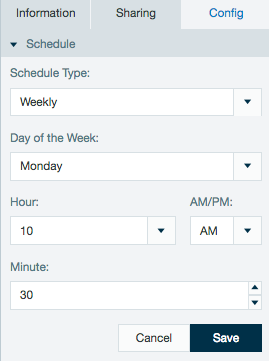
Schedules created with non complex cron patterns are converted automatically in the inspector. Select Schedule Type and Custom from the drop down menu to view or edit the schedule cron pattern.
Editing Export Job Settings
Only the data from a saved workbook sheet is available for export.
To edit export job settings:
- Highlight by clicking on the export job you want to edit.
- Right-click the export job and select edit or click the edit button in the toolbar at the top of the screen.
- Make the necessary changes (see exporting data for more information.) Use the Next to navigate through the individual configuration screens.
- Click Save after you have finished or Save Copy As if you want to save the changed settings under a new name.
Duplicate Export Jobs
To create a copy of an existing export job:
- Highlight by clicking on the export job you want to duplicate.
- Right click the export job and select Duplicate or click the Duplicate button in the toolbar at the top of the screen.
- Click the Create Duplicate.
A duplicate is created and is named "copy of ..." and the name of the original export job.
Running an Export Job
To run an export job:
- Highlight by clicking the export job you want to run.
- Right-click the export job and select Run or click the Run button in the toolbar at the top of the screen.
Depending on the amount of data, this process may take awhile.
The default configuration has Hadoop distributing the export job to increase performance. The number of split files depends on the amount of data in the export. Each of the split files is exported with an attached sequence number starting with _00000.
It is possible to configure the export to go to a single file but isn't recommended unless necessary as it may cause performance slowdowns with larger files.
Export jobs run as a single task if the source sheet is sorted. The sorted sheet can be generated in parallel in the workbook, but the export job forces the job to run as a single task. To get around this, create a filter on the primary export sheet restricting it to a specific range and select the option to create this filter in a new sheet. Do this multiple times until all of the data is filtered out into separate sheets. Once done, run export jobs against these newly created sheets.
Deleting an Export Job
Only the export job is deleted, not the original data.
To delete an export job:
- Highlight by clicking the export job you want to delete.
- Right-click the export job and select Delete or click the Delete button in the toolbar at the top of the screen.
- Click Delete and confirm that you would want to perform this action.
Editing Export Job Permissions
To edit an export job's permissions:
- Highlight by clicking the export job for which you want to edit permissions.
- Right-click the export job and select Information or click the Information button on the toolbar.
- The permissions setting is listed at the bottom of the Sharing section of the information page.
- To add group permissions, click Add Group and select each group you want to add. Then set the read, write, and run (execute) permissions for that group. To delete a group, click the trash can icon next to that group.
- Set the results sharing permissions for each group and all others.
Knowledge Base Articles on Exporting Data
- Export Job Failing From Permission Denied Error
- How to Export a Sample Data Set
- Netezza Exports Fail with a Column Value of "Null'"
- SQLServerException: The transaction log for database ... is full due to 'ACTIVE_TRANSACTION'.