A data link lets you feed data into a workbook without using an import job. The difference between the two job types is when the full data set is loaded. A data link fetches only the preview data for the workbook view; when you run the workbook, the full data set is used. When you run an import job, the full data set gets loaded.
You can also edit, rename, create a copy, run, view the full data, view the details and information, or delete an existing data link.
| Table of Contents |
|---|
About Data Links
You can create a data link from an existing connection or by selecting a new connection.
See Types of Data Supported for information about the types of files that you can link to in Datameer.
Creating a Data Link
To create a data link:
- Click the + (plus) button and select Data link or right-click in the browser select Create new > Data link.
- Click Select Connection, select the connection and click Select, then click Next. Click New Connection to add a new connection if needed.
- Specify the file and folder location and click Next. You can use wildcard characters. See the sections that follow for additional details about importing each of the file types.
- Apache log: Specify the file or folder and the log format. See the samples provided in the dialog box for details.
- CSV/TSV files: Specify the delimiter such as"\t" for tab, comma ",", or semicolon ";", specify whether the first row contains the column headers and click Advanced Settings. In Advanced Settings, specify the escape character to "escape" processing that character and just show it, set the quote character, and if enter strict quoting is checked, characters outside the quotes are ignored.
- Fixed width: Specify the file or folder and specify whether the first row contains the column headers.
- Mbox: Specify the file or folder. This is a format used for collections of electronic mail messages.
Text files: Specify the file or folder, a regex pattern for processing the data, and specify whether the first row contains the column headers.
- Twitter data: Specify the file or folder.
- View a sample of the data set to confirm this is the data source you want to use, and mark the checkboxes to select which fields to link into Datameer.
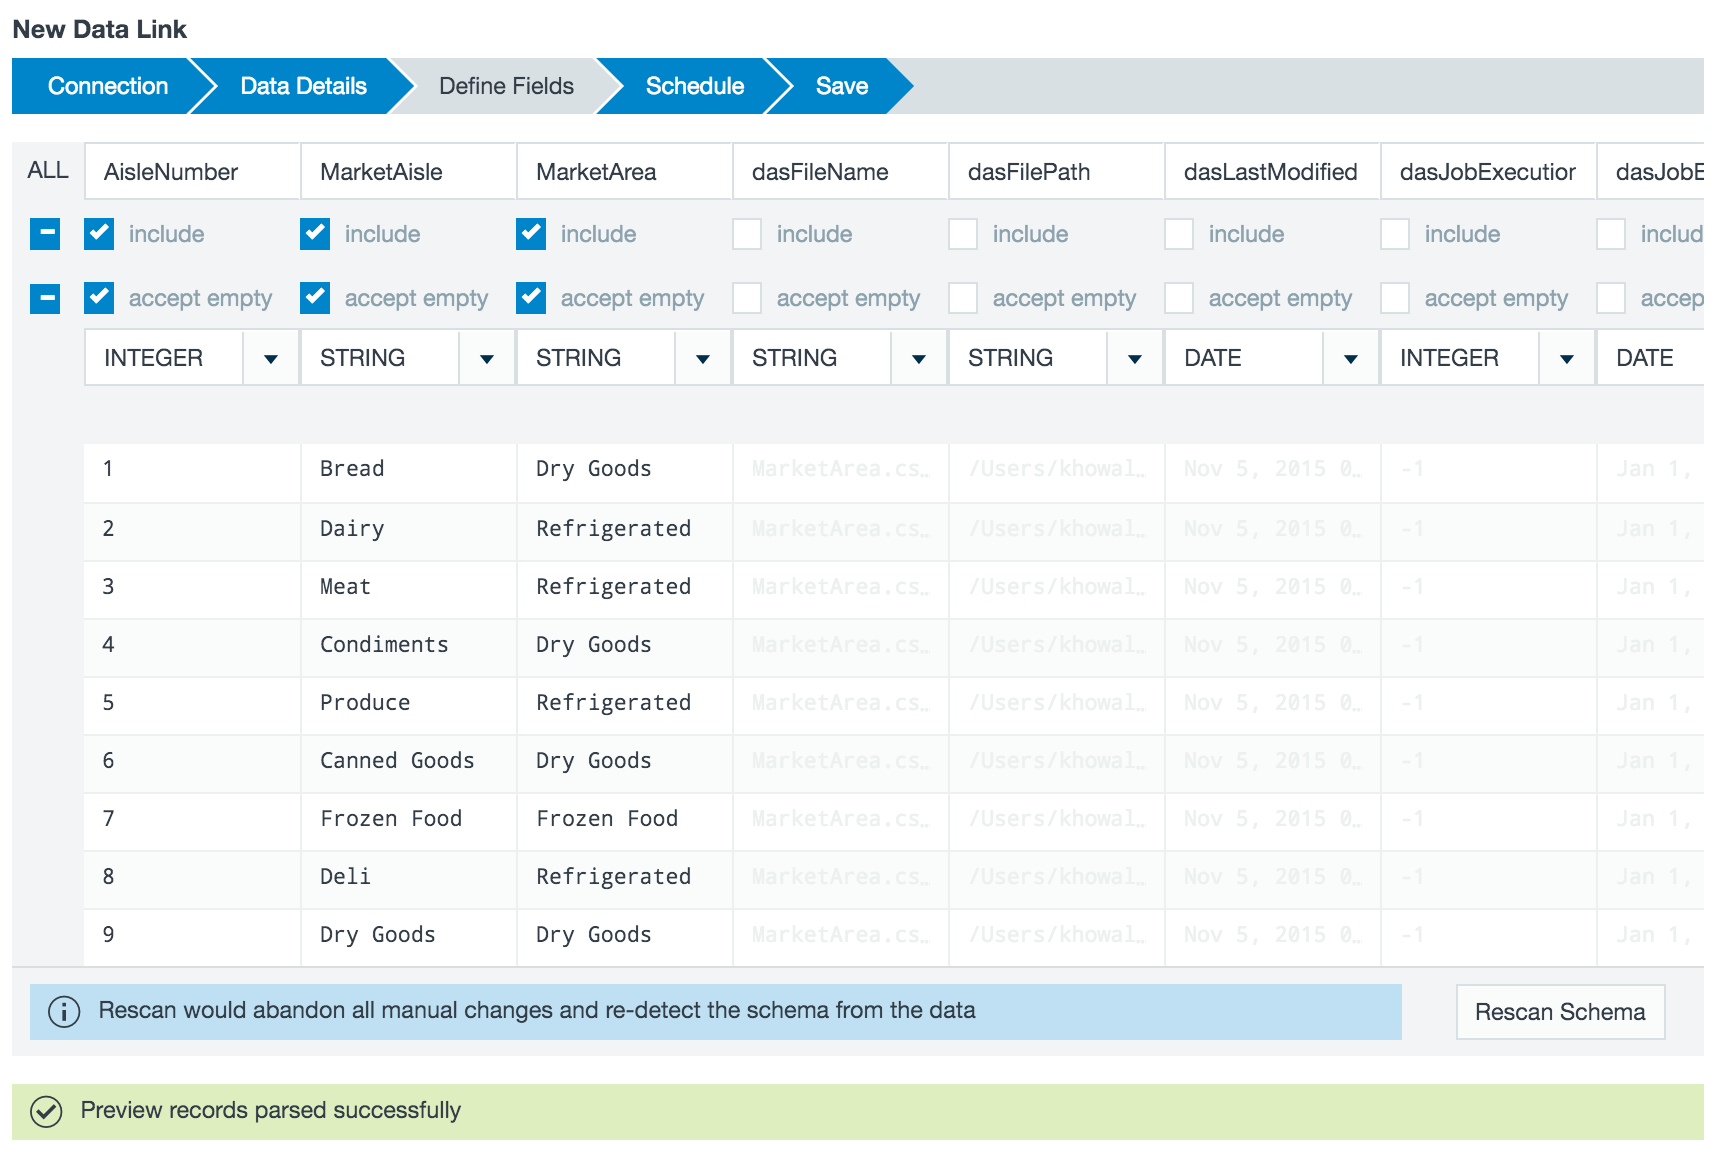
You can specify how to handle empty fields and invalid data. The Empty value placeholders section gives you the ability to assign specific values as NULL. Values added here aren't imported into Datameer.

- Click Next.
- Define the schedule details and click Next. See Configuring Workbook Settings for information on the schedule details.
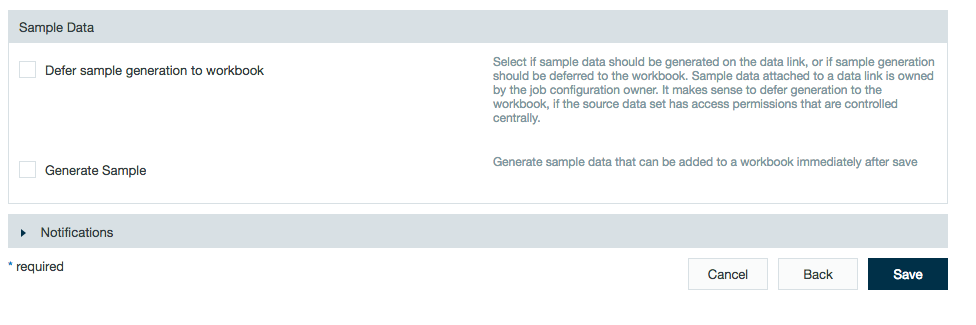
Enter a description and select how to handle sample data.Anchor sample_data sample_data
Users have the option to generate sample data immediately after saving the data link (this saves the sample data to the DM private folder during the data link ingestion) or deferring sample data generation until using the data link in a workbook. Deferring sample generation is useful for when the data link is available to multiple users but each user may have different access to the original source of the data link. When deferring sample data, the sample data is created and stored in the DM private folder by the workbook user rather than the data link creator. This sample data access still follows impersonation security policies (e.g., Sentry/Ranger).
Click Save.
- Name the file, and click Save.
| Anchor | ||||
|---|---|---|---|---|
|
You have a great deal of flexibility in choosing when jobs are run. You can choose to run them manuallyor at a interval you specify.
- Create an new data link or right-click and select Open to open the data link configuration wizard.
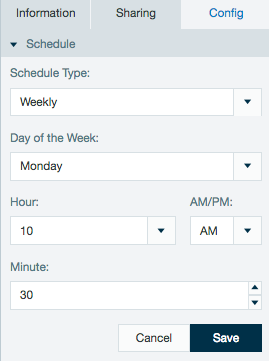
- Under the Schedule settings, select Manually or Scheduled.
- When Scheduled is selected, specificy a time for the data link to run.
- Click Save to save your changes.

| Anchor | ||||
|---|---|---|---|---|
|
Schedules created with non complex cron patterns are converted automatically in the inspector. Select Schedule Type and Custom from the drop down menu to view or edit the schedule cron pattern.
Edit a Data Link
To edit a data link:
- Click the File Browser tab.
- Click the Data Links from the navigation box on the left side.
- Right-click data link you want to edit and select Configure. (As of v6.3, click Open.)
- Make your changes and click Next to move through the wizard.
- Click Save when finished.
| Anchor | ||||
|---|---|---|---|---|
|
To create partitions when linking data:
- Create a new data link or select to edit a current data link.
- Go to the Data Details section.
Enter the path for the files or folders and include the %pattern% where the files are located.
Note icon false The %pattern% specifies a folder structure and defines which files from the included folders should be included in the DataLink partition. This feature can't be used on direct filenames.
For example, instead of using
/data/archive/newsvine/Newsvine_Users_20140104.txt, use newsvine/%pattern% when the Path Prefix is set to/data/archive.More examples:

/Users/MattSmith/Desktop/Geo_coords/%pattern%/geodata.csv
/Users/MattSmith/Desktop/Geo_coords/%pattern%.csv)- Scroll down to Time Based Partitions and select the On setting.
- In Partition Pattern enter a date format expression like 'yyyy/MM/dd' which replaces the %pattern% placeholder in the file path. In the example above, you would use
'Newsvine_Users_'yyyMMdd.txt'. - Click Next when you have finished and save the file.

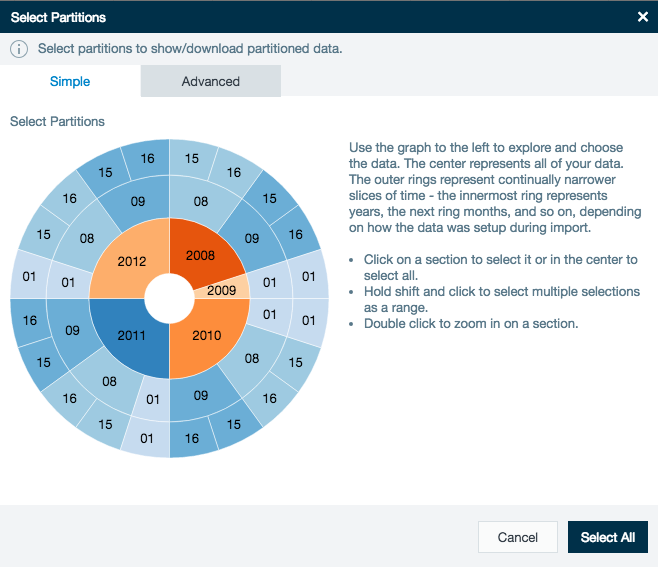
When creating or opening the linked data in a workbook the partitioned data is displayed. You can then select the data you want to analyze.

| Anchor | ||||
|---|---|---|---|---|
|
You can read and use the Hive and Hive2 partitions while creating a data link and map them into Datameer. This mapping only works for date and time partitions - it doesn't map string partitions that aren't parsed to date or time. When partitioning on the Hive side changes, you receive an error message in the workbook. To fix this, change the partitioning in the workbook by clicking the Partition button.
- Create a connection using Hive.
- Create a new data link and select your Hive connection.
- Select which tables and databases you want to ingest on the Data Details page.
On the Filter page select Enable partitioning.
Note As of Datameer 7.4
Performance and speed have been impoved when filters set on a partitiioned workbook column pushes from your Hive data link. Before, the full data in the Hive table was being read and filtered which included your column's partition. Now, only the selected column's partition is being read and filtered.
Define the date pattern to map to Hive's time based partitions. For example, if in Hive you have three columns with integer values which contain year, month, and date, then each value must be defined in a different field.

If you have one column with a string value, use one field to define the pattern, such as yyyy-MM-dd.
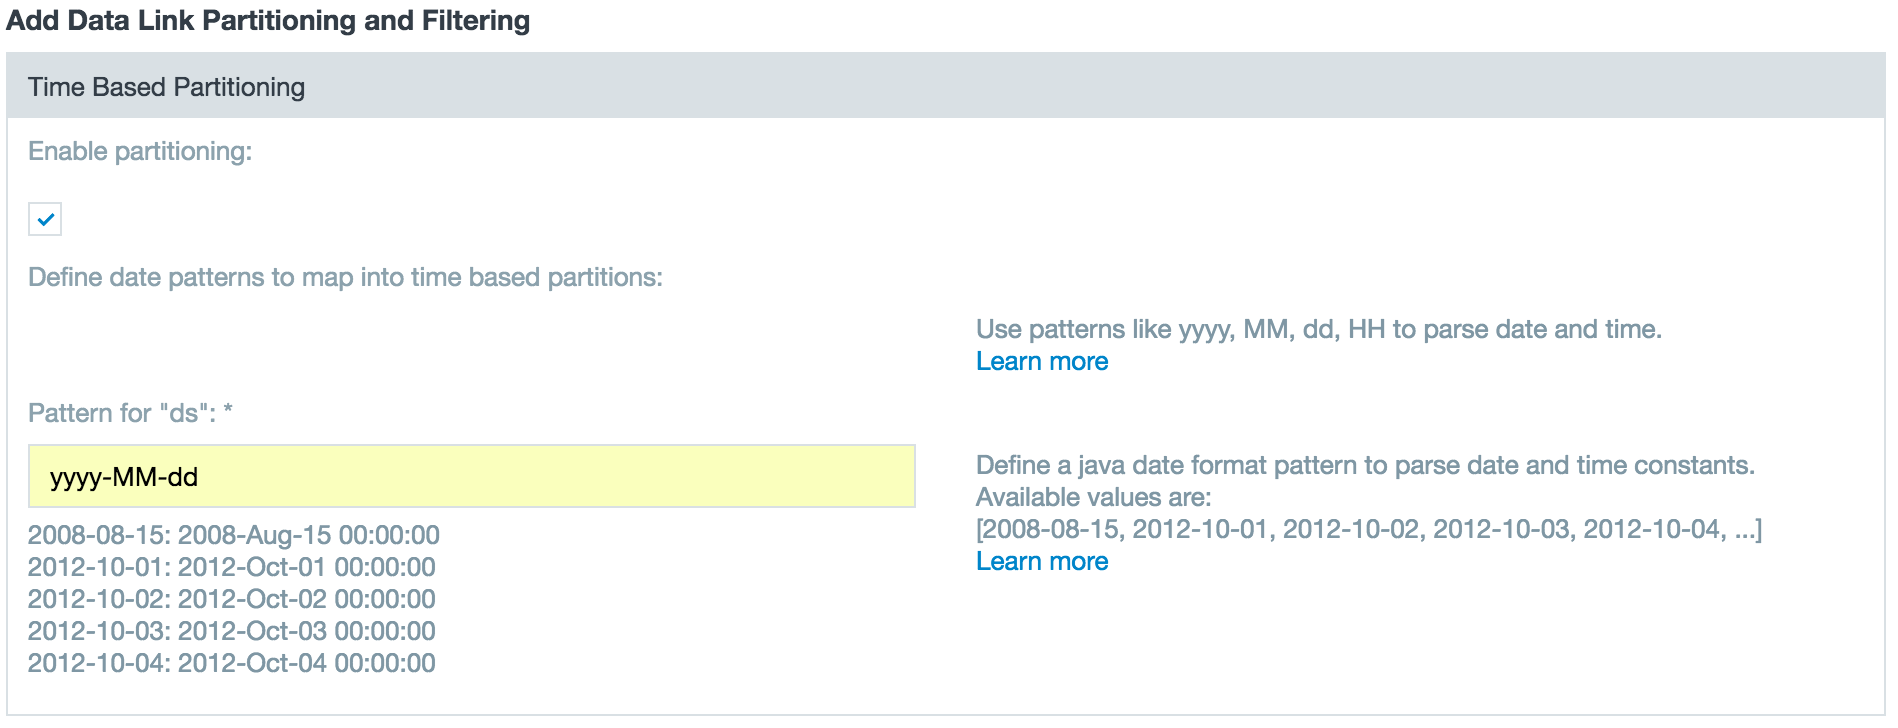
In the Advanced section you can select a check box to set how to handle invalid partition values. If you check box selected, partitions that don't match the pattern are ignored and the data link job runs, logging ignored partitions in the logfile. If the box is not selected, the data link job fails if it encounters a value that does not match the partition pattern.

As with any other partitioned data, when creating or opening the linked data in a workbook the partitioned data is displayed. You can then select the data you want to analyze.
Copying a Data Link
To copy a data link:
- Click the File Browser tab.
- Click Data Links from the navigation box on the left side.
- Right-click the data link you want to copy and select Duplicate.
The copy is created and is named "copy of " and the name of the original data link.
Running a Data Link
To run a data link:
- Click the File Browser tab.
- Click Data Links from the navigation box.
- Right-click the data link you want to run and select Run .
- Depending on the volume of data, this could take awhile.
Deleting a Data Link
The delete feature deletes the data link in Datameer but doesn't delete the actual data.
To delete a data link:
- Click the File Browser tab.
- Click DataLinks from the navigation box.
- Right-click the data link you want to delete and select Delete .
- Click OK and then confirm the deletion.
Setting Permissions
Only an administrator can set permissions.
To set permissions for a data link:
- Click the File Browser tab.
- Click Data Links from the navigation box.
- Right-click the data link you want to set permissions for and select Information .
- Optionally add one or more groups to this link. Set view, edit, and run permissions for each group.
- Set view, edit, and run permissions for all users.
Viewing Import Job Upload Size and Monthly Upload Sizes
You can view the count of processed bytes for each upload and their total volume counting towards the license term.
To view the processed bytes per single job execution and totals for that job configuration of the data link:
- Click the File Browser tab.
- Click DataLinks from the navigation box.
- The size of last job run is displayed first and the total for that job configuration is displayed to the right in parentheses.
If a new license term starts and the data link is processed again, the count starts with a new total processed data amount.